
How location breakdowns change in the new 3.0 version?
- Before: All work packages used the same location breakdown level in the same schedule view. Location breakdowns needed to be built outside the schedule.
- Now: You can use different location breakdowns for different packages in the same view. For example, structural work can be planned at section level, while MEP work is planned at apartment level. All this can be done inside the schedule.
-
Location View: A new view that makes it easy to work with these location-based, flow-style schedules. Location view allows you to have an overview of the phases and move whole phases with ease
How it works?
In 3.0 you can define the level of locations inside the schedule. You can also define the location level separately for each phase in the schedule.
For example:
- element installation can be scheduled on a floor level locations and
- floor installation can be planned on a section or an apartment level.
Changing the location breakdown inside the schedule
In Sitedrive 3.0 you can
- Change the level of locations (e.g. floor -> section)
- Group locations together
- Change the order of locations
Edit the location breakdown in the location based schedule views by clicking on the pen symbol on top of the areas.
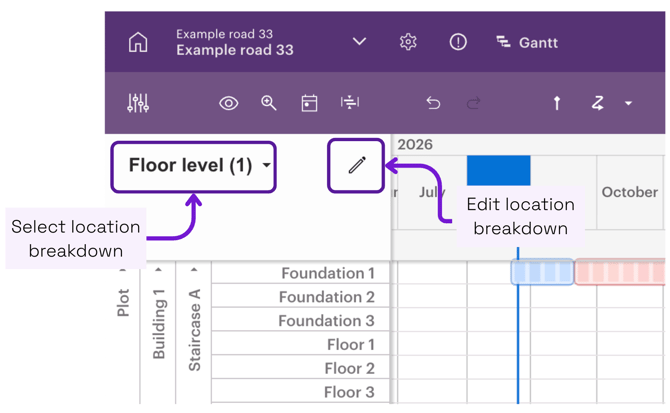
Use the arrow keys next to the level number to change the location level.
To group locations together, hold Shift or Ctrl (Cmd on Mac) while selecting them.
To change the order of locations, drag them into the correct positions.
%20(18).gif?width=670&height=350&name=Untitled%20(1008%20x%20527%20px)%20(18).gif)
Setting locations in the Gantt view:
The areas selected for each work phase in the Location view are also visible in the Gantt view. You can also edit the areas of work packages and work phases directly in the Gantt view as well.
Here is how to edit the areas and the level of areas:
- Opening the menu of the work package you want to add the locations to and selecting the option to "Define areas".
- You define areas on a work phase level or a work package level, but defining the level of the spaces can only be done on a phase level.
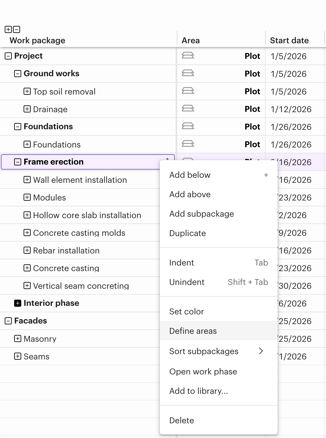
2. In the Area definition panel on the right, select the location breakdown you want to use for this work package. On a work phase, you can change the location breakdown in the "Define areas" panel, by selecting which location breakdown you want to use.
How to filter out unnecessary locations?
In the 3.0 version, you can use filters to hide locations you don’t need to see.
- Create a new tab in the schedule view.
- Add filters so that only the desired locations are shown.
- Lock the filtering if you want other users to see the same filtering settings. With site level access rights, you can pin a view so that it will stay visible to all users.
%20(12)-gif.gif?width=670&height=350&name=Untitled%20(1008%20x%20527%20px)%20(12)-gif.gif)
Show the works in a specific location level
You can show any works with a specific location level. You can e.g. open a Takt view and modify its location breakdown
%20(13)-gif.gif?width=670&height=350&name=Untitled%20(1008%20x%20527%20px)%20(13)-gif.gif)
Note: View settings can only be changed in your custom views. If you are using a pre-made basic views or situation views, you cannot edit these settings yourself. If you want, you can make a copy of the view, where you are able to edit these location settings.